24 x 46 RF Patio Build

Discussion about Reverse Flow Smokers
User avatar
SeenRed
Senior SmokerBuilder
Posts: 99
Joined: March 19th, 2017, 7:54 pm
Title: Member
BBQ Comp Team Name: Not competing yet...
Location: NE Oklahoma

24 x 46 RF Patio Build

Post by SeenRed » June 30th, 2022, 9:07 pm

This is my first build...last summer I found a propane tank that was 24" diameter and almost 11 feet long - big enough to build at least 2 patio smokers. I purchased a set of plans from Frank that matched my tank's diameter...the plans are for a 24 x 46 reverse flow. Then the pandemic, and high steel prices held up the build for several months...but I'm finally getting cranked up.

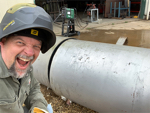
Here is the tank I'm working with...5/16" thickness by 24" diameter by nearly 11' long
img1.jpg

Plasma cut the tank roughly in half. I'm doing this build from the half that has only one bung to cut out. The other half will be saved for another build later on.
img2.jpg

Using a couple cheap Harbor Freight furniture dollies to move this heavy bastage around in my shop.
img3.jpg

Got the bung plasma-cut out.
img5.jpg

Cut a piece to scab up the bung hole from the drop end where I cut down to my final length - this way the curve matches the hole where I cut out the bung.
img6.jpg

Most of the paint and rust stripped...about ready to start some fabricating.
img7.JPG
img8.JPG

Red
Last edited by SeenRed on July 1st, 2022, 2:36 pm, edited 1 time in total.


Sign Up For SmokerBuilderU
User avatar
SeenRed
Senior SmokerBuilder
Posts: 99
Joined: March 19th, 2017, 7:54 pm
Title: Member
BBQ Comp Team Name: Not competing yet...
Location: NE Oklahoma

Re: 24 x 46 RF Patio Build

Post by SeenRed » June 30th, 2022, 9:49 pm

A trip to the steel yard. I'm using 2" x 11 g sq. tubing for the cart, and a 4x8 sheet of 1/4" smooth plate for the firebox, CC end plate, and baffle plate.

Got the tubing for the cart all cut. After some good advice I got in an earlier thread (thanks gents!) I designed the cart to allow for about a 36" main grate height in the cook chamber.
img9.jpeg

Took me a while to figure out a way to move and lift this 4x8 1/4" plate...which involved purchasing a vertical plate clamp from Amazon. Got it up on my weld table to lay out all the cuts for the firebox, end plate and baffle plate.
img10.jpeg

The FB, CC end plate, and BP all plasma cut
img11.jpg

The cart's all tacked up, then checked it on the tank to make sure I could make it fit
img12.jpg
img13.jpg

Got caster plates tacked on the legs, then got the cart all welded out.

img15.jpg

Checked to see how close the fit-up is between the cart and the tank.
img17.jpg
img18.jpg

Not horrible but not great either...I guess I'm gonna have to raise the tank, grind, lower the tank and recheck...then repeat - until I get a fit-up I can live with...unless anyone has a better idea?

img19.jpg
img20.jpg

Red
Last edited by SeenRed on July 1st, 2022, 2:37 pm, edited 1 time in total.


User avatar
SheffSmoker
Expert
Expert
Posts: 393
Joined: June 12th, 2020, 11:45 am
Title: Junk Fettler
BBQ Comp Team Name: Not competing, normally too drunk.
Location: UK

Re: 24 x 46 RF Patio Build

Post by SheffSmoker » July 1st, 2022, 9:50 am

The RF I'm 3/4 way through finishing, the frame and tank are almost identical. You've got a couple of options here:

1. If you want a perfect fit, make a cardboard template that matches the tank profile, then mark that onto the legs and grind the profile in. Risk with this is the tank will not be level after unless you start from a datum point on all 4 legs.

2. Gradually fill the gap with pass after pass of weld on the CC until it meets the leg.

Second option is what I did - mainly because I have plenty of time and not rushing things, and I blended the two in after so it looks nice and smooth.


You can never have too many hammers.

User avatar
Dirtytires
Expert
Expert
Posts: 3845
Joined: November 24th, 2015, 12:36 am
Title: It ain't broke...yet
BBQ Comp Team Name: Dont compete...cook for events once in a while
Location: Phoenix, Az

Re: 24 x 46 RF Patio Build

Post by Dirtytires » July 1st, 2022, 10:03 am

Making some great progress! Keep at it as it looks really good.


User avatar
SeenRed
Senior SmokerBuilder
Posts: 99
Joined: March 19th, 2017, 7:54 pm
Title: Member
BBQ Comp Team Name: Not competing yet...
Location: NE Oklahoma

Re: 24 x 46 RF Patio Build

Post by SeenRed » July 1st, 2022, 2:36 pm

SheffSmoker wrote:
July 1st, 2022, 9:50 am

1. If you want a perfect fit, make a cardboard template that matches the tank profile, then mark that onto the legs and grind the profile in. Risk with this is the tank will not be level after unless you start from a datum point on all 4 legs.

2. Gradually fill the gap with pass after pass of weld on the CC until it meets the leg.
Both seem like viable options. I may start with a cardboard template and see how close I can get it without screwing up the level too much…then move on to option 2. That might reduce a lot of the extra grinding needed to make it smooth after I fill any gaps with filler.

Appreciate the input!

Red


User avatar
SeenRed
Senior SmokerBuilder
Posts: 99
Joined: March 19th, 2017, 7:54 pm
Title: Member
BBQ Comp Team Name: Not competing yet...
Location: NE Oklahoma

Re: 24 x 46 RF Patio Build

Post by SeenRed » July 1st, 2022, 2:38 pm

Dirtytires wrote:
July 1st, 2022, 10:03 am
Making some great progress! Keep at it as it looks really good.
Thanks DT…appreciate the encouragement!

Red


User avatar
SeenRed
Senior SmokerBuilder
Posts: 99
Joined: March 19th, 2017, 7:54 pm
Title: Member
BBQ Comp Team Name: Not competing yet...
Location: NE Oklahoma

Re: 24 x 46 RF Patio Build

Post by SeenRed » July 2nd, 2022, 3:30 pm

Another quick question guys.

Before I install the baffle plate and fab the FB, I want to burn out the CC with a very hot fire. Do y’all think it’ll draw enough oxygen to burn really hot as is…or do you think I need to go ahead and cut the door out - only for burnout airflow? I want to limit the opportunities for the door to warp, so if it would get enough oxygen without cutting the door first, I’d rather burn it out first.

What do ya think?

Red


User avatar
Pete Mazz
Administrator
Administrator
Posts: 3399
Joined: February 16th, 2013, 8:19 am
Title: Meathead
Location: Bucks County, PA

Re: 24 x 46 RF Patio Build

Post by Pete Mazz » July 3rd, 2022, 3:47 am

With the one end open it should burn fine.


If it's tourist season, how come I can't shoot 'em?

Don't speak the language? Try this: Smoker Terminology

Try my SmokerBuilder Calculators

User avatar
SeenRed
Senior SmokerBuilder
Posts: 99
Joined: March 19th, 2017, 7:54 pm
Title: Member
BBQ Comp Team Name: Not competing yet...
Location: NE Oklahoma

Re: 24 x 46 RF Patio Build

Post by SeenRed » July 3rd, 2022, 5:51 pm

Pete Mazz wrote:
July 3rd, 2022, 3:47 am
With the one end open it should burn fine.
Thank you Pete…I thought so, but good to hear. As soon as I get the fit-up between CC and cart where I want it, next thing I’m gonna do is burn it out.

Red


User avatar
Big T
Moderator
Moderator
Posts: 6897
Joined: September 1st, 2013, 2:40 pm
Title: Go Getter
BBQ Comp Team Name: Backyard Boys
Location: Lower Alabama

Re: 24 x 46 RF Patio Build

Post by Big T » July 3rd, 2022, 11:18 pm

:LG:


Measure Twice.....Cut Three Times.

User avatar
SeenRed
Senior SmokerBuilder
Posts: 99
Joined: March 19th, 2017, 7:54 pm
Title: Member
BBQ Comp Team Name: Not competing yet...
Location: NE Oklahoma

Re: 24 x 46 RF Patio Build

Post by SeenRed » July 4th, 2022, 9:36 am

Big T wrote:
July 3rd, 2022, 11:18 pm
:LG:
:-bd :-bd


User avatar
Frank_Cox
Site Admin
Site Admin
Posts: 7160
Joined: January 17th, 2011, 6:30 pm
BBQ Comp Team Name: https://smokerbuilderu.com
Contact:

Re: 24 x 46 RF Patio Build

Post by Frank_Cox » July 9th, 2022, 9:06 pm

Looks awesome!
That looks like the same racks I’m using for my current build!
I cut up 3 long skinny 500’s.
30 diam. by 156 long


Sent from my iPhone using Tapatalk


User avatar
SeenRed
Senior SmokerBuilder
Posts: 99
Joined: March 19th, 2017, 7:54 pm
Title: Member
BBQ Comp Team Name: Not competing yet...
Location: NE Oklahoma

Re: 24 x 46 RF Patio Build

Post by SeenRed » July 10th, 2022, 5:18 pm

Frank_Cox wrote:
July 9th, 2022, 9:06 pm
Looks awesome!
That looks like the same racks I’m using for my current build!
I cut up 3 long skinny 500’s.
30 diam. by 156 long


Sent from my iPhone using Tapatalk

Thanks Frank…progress is slow, but I’m getting there.

Red


User avatar
SeenRed
Senior SmokerBuilder
Posts: 99
Joined: March 19th, 2017, 7:54 pm
Title: Member
BBQ Comp Team Name: Not competing yet...
Location: NE Oklahoma

Re: 24 x 46 RF Patio Build

Post by SeenRed » July 23rd, 2022, 2:49 pm

Frank_Cox wrote:
July 9th, 2022, 9:06 pm
Looks awesome!
That looks like the same racks I’m using for my current build!
I cut up 3 long skinny 500’s.
30 diam. by 156 long


Sent from my iPhone using Tapatalk

I've been following that build - looks great! Only differences in the tanks that I can tell are, mine was only 24 diam. and about 132 long.

Red


Eric_Tuell
beginner
beginner
Posts: 12
Joined: July 14th, 2022, 3:26 pm

Re: 24 x 46 RF Patio Build

Post by Eric_Tuell » July 24th, 2022, 4:37 pm

:-bd Build looks good


:beer:

User avatar
SeenRed
Senior SmokerBuilder
Posts: 99
Joined: March 19th, 2017, 7:54 pm
Title: Member
BBQ Comp Team Name: Not competing yet...
Location: NE Oklahoma

Re: 24 x 46 RF Patio Build

Post by SeenRed » July 25th, 2022, 11:01 pm

Eric_Tuell wrote:
July 24th, 2022, 4:37 pm
:-bd Build looks good
Thank you sir!

Red


ThinBlue
SmokerBuilder Addict
Posts: 154
Joined: September 16th, 2021, 8:15 am
Title: Serious goof
BBQ Comp Team Name: Not competing yet...
Contact:

Re: 24 x 46 RF Patio Build

Post by ThinBlue » July 29th, 2022, 8:52 pm

Looks like it's coming along really good. What's it like working with fresh, clean, nonwarped plate steel? Cheater lol

No but seriously, it's looking good.

Sent from my GM1917 using Tapatalk


User avatar
SeenRed
Senior SmokerBuilder
Posts: 99
Joined: March 19th, 2017, 7:54 pm
Title: Member
BBQ Comp Team Name: Not competing yet...
Location: NE Oklahoma

Re: 24 x 46 RF Patio Build

Post by SeenRed » July 30th, 2022, 2:19 pm

ThinBlue wrote:
July 29th, 2022, 8:52 pm

What's it like working with fresh, clean, nonwarped plate steel?


Sent from my GM1917 using Tapatalk
Expensive! :-o

One 4x8 sheet of 1/4” plate at my local steel yard: $365 - and that price is down from $450 just a few months ago.

Red


User avatar
SeenRed
Senior SmokerBuilder
Posts: 99
Joined: March 19th, 2017, 7:54 pm
Title: Member
BBQ Comp Team Name: Not competing yet...
Location: NE Oklahoma

Re: 24 x 46 RF Patio Build

Post by SeenRed » July 30th, 2022, 2:20 pm

ThinBlue wrote:
July 29th, 2022, 8:52 pm

No but seriously, it's looking good.

Sent from my GM1917 using Tapatalk
And thank you for the kind words! :kewl:

Red


User avatar
SeenRed
Senior SmokerBuilder
Posts: 99
Joined: March 19th, 2017, 7:54 pm
Title: Member
BBQ Comp Team Name: Not competing yet...
Location: NE Oklahoma

Re: 24 x 46 RF Patio Build

Post by SeenRed » October 3rd, 2022, 2:11 pm

It's been a minute since I made any updates on this build. To be honest, there was a stretch of several weeks when I didn't work on the build at all. The second half of our summer was brutally hot. My sheet-metal-skinned shop is uninsulated, and the only cooling I have out there is a shop fan. We went through a stretch of something like 27 days straight of triple digits temps. I'm too old and too soft to suffer in that kind of heat! The heat finally broke, so I'm just beginning to get cranked back up again.

Got the cart welded to the CC barrel, and I've also temporarily bolted my casters on so I can move it outside for a burnout.

img25.JPG
img26.JPG


Got a good hot fire going for a couple hours to burn it out nice.

img27.JPG

More to follow...

Red


User avatar
SeenRed
Senior SmokerBuilder
Posts: 99
Joined: March 19th, 2017, 7:54 pm
Title: Member
BBQ Comp Team Name: Not competing yet...
Location: NE Oklahoma

Re: 24 x 46 RF Patio Build

Post by SeenRed » October 3rd, 2022, 3:05 pm

I'm hoping for some advice on a couple things. I'm about ready to cut the door into the CC, and haven't really decided on where the top and bottom of the the door should be relative to top dead center and the tank's equator.

First question: Is there a consensus opinion on where the door should hinge at the top? Right at top dead center? Or a little above or below top dead center?

In this pic, I've got a line laid out directly on top dead center. Are there reasons I should consider making it hinge an inch or 2 above or below this line? Or is top dead center the best place for the top of the door?
img22.JPG

Second question: What about the bottom of the door? Where should it be in relation to the equator of the tank? Although I haven't gotten that far yet, I hope to be able to build the main cooking grate on a slide-out rail...and I don't want the door to be in the way. Does the bottom of the door affect this, or am I overthinking it?

This pic shows my first try at laying out the bottom of the door. This line is well below the equator of the tank...and my thinking is, I might have it too low. My other concern is leaving enough space above the cart legs for a flat bar flange around the door. Any advice?
img24.JPG

Last question (at least for now lol): I'm also pretty close to making the remaining plasma cuts in the firebox panels. My question is about the firebox door cutout. Frank's plans call for a 3 inch standoff all the way around on the firebox door (laid out in the pic below). I'm thinking that 3 inches - especially on the bottom - is too much standoff. That makes for a pretty small firebox door. Won't this make ash cleanout more challenging? And if I have the space to do so in the firebox, I hope to fabricate an ash pan that I can pull out to empty. It seems like a 3 inch standoff at the bottom might be too much to allow that. Couldn't I make the standoff on the bottom 1 inch instead of 3? That'd make for a bigger door and more clearance for loading wood and emptying the ash pan. Any insights on this from those of you have built fireboxes with pull-out ash pans in the bottom?
img21.JPG

Hope I can take advantage of the experience and expertise of guys who've already faced similar situations.

Thanks in advance...

Red


User avatar
Big T
Moderator
Moderator
Posts: 6897
Joined: September 1st, 2013, 2:40 pm
Title: Go Getter
BBQ Comp Team Name: Backyard Boys
Location: Lower Alabama

Re: 24 x 46 RF Patio Build

Post by Big T » October 3rd, 2022, 3:18 pm

I make my top cut 1" past TDC, once you add a flange on the door you don't have to worry about any rainwater getting inside the CC. I like the bottom of the door to be 1'' below the 3 oclock position so that my bottom cooking grate is at the widest point of the CC. As for the fire box door, you could probably cut it down to 1'' and there not be any issues but it may be wise to put a brace of some sort across the 1'' strip. I have saw a few guys that got the fire too hot and warped their doors so the small strip may try to distort a little. I frame my fire box with 1.5'' angle iron and add rails for my ash pan and never have any issues.
:LG:


Measure Twice.....Cut Three Times.

User avatar
SeenRed
Senior SmokerBuilder
Posts: 99
Joined: March 19th, 2017, 7:54 pm
Title: Member
BBQ Comp Team Name: Not competing yet...
Location: NE Oklahoma

Re: 24 x 46 RF Patio Build

Post by SeenRed » October 3rd, 2022, 9:10 pm

Big T wrote:
October 3rd, 2022, 3:18 pm
I make my top cut 1" past TDC, once you add a flange on the door you don't have to worry about any rainwater getting inside the CC. I like the bottom of the door to be 1'' below the 3 oclock position so that my bottom cooking grate is at the widest point of the CC. As for the fire box door, you could probably cut it down to 1'' and there not be any issues but it may be wise to put a brace of some sort across the 1'' strip. I have saw a few guys that got the fire too hot and warped their doors so the small strip may try to distort a little. I frame my fire box with 1.5'' angle iron and add rails for my ash pan and never have any issues.
:LG:

That all makes good sense. I hadn’t considered heat distortion being a possible issue in a smaller strip of steel - makes me glad I asked!

Thanks T!

Red


User avatar
Dirtytires
Expert
Expert
Posts: 3845
Joined: November 24th, 2015, 12:36 am
Title: It ain't broke...yet
BBQ Comp Team Name: Dont compete...cook for events once in a while
Location: Phoenix, Az

Re: 24 x 46 RF Patio Build

Post by Dirtytires » October 4th, 2022, 10:46 am

Yep....what Big T said!

Just a note on the bottom shelf...The goal is to have the top of the shelf at dead center so it is as big as possible. I frame my shelves with 1" angle so make the bottom door cut 1" below center. If you are going to use the bottom lip of the shelf for the "pull", instead of adding a pull on the top of the shelf, you might want to add another inch clearance so you don't smash your fingers every time you slide a drawer back in.


User avatar
SeenRed
Senior SmokerBuilder
Posts: 99
Joined: March 19th, 2017, 7:54 pm
Title: Member
BBQ Comp Team Name: Not competing yet...
Location: NE Oklahoma

Re: 24 x 46 RF Patio Build

Post by SeenRed » October 4th, 2022, 11:01 am

Dirtytires wrote:
October 4th, 2022, 10:46 am
Yep....what Big T said!

Just a note on the bottom shelf...The goal is to have the top of the shelf at dead center so it is as big as possible. I frame my shelves with 1" angle so make the bottom door cut 1" below center. If you are going to use the bottom lip of the shelf for the "pull", instead of adding a pull on the top of the shelf, you might want to add another inch clearance so you don't smash your fingers every time you slide a drawer back in.
Thanks man! Seems like I'm adapting and adjusting as I go along...but I'm thinking I want the bottom of the door cut just low enough to allow the rack to slide out - and I'll probably add a pull of some kind to the top of the rack.

So based on yall's good advice, I'm leaning toward cutting the door 1 inch past TDC, and 1 inch below 3 o'clock/equator.

Really appreciate the input! :kewl:

Red


Post Reply
  • Similar Topics
    Replies
    Views
    Last post

Return to “Reverse Flow Smokers”